DearFlip supports basic analytics using Google Analytics.
How to add?
You can enable the analytics in Global Settings Page.
Google Analytics is not set by the flipbook plugin, it is only used if there is Google Analytics ID already available in the site. You have to set Enable Google analytics to true in Global settings. And if there is Google analytics added to your site, it will be sent as events in Google Analytics report.

Please remember to add Google Analytics scripts into your site using a Google Analytics plugin or using the code provided by Google Analytics.
What data is tracked?
DearFlip send events to Google analytics when user interacts with the flipbook. Regarding actions, the plugin tracks following Event Names:
- Open Book (for popups) – triggers when user clicks on a thumb/button to open flipbook
- Book Ready – triggers when the flipbook has loaded
- First Page Flip – triggers when user changes any page – Used to determine if user has flipped the flipbook
- Book Closed (for popups) – triggers when user clicks on close button of lightbox(popup) to close a flipbook
The rest of the actions need to be implemented by the users depending on their needs. You will need to have JavaScript understanding for that or you can get a developer’s help.
Where to view the data?
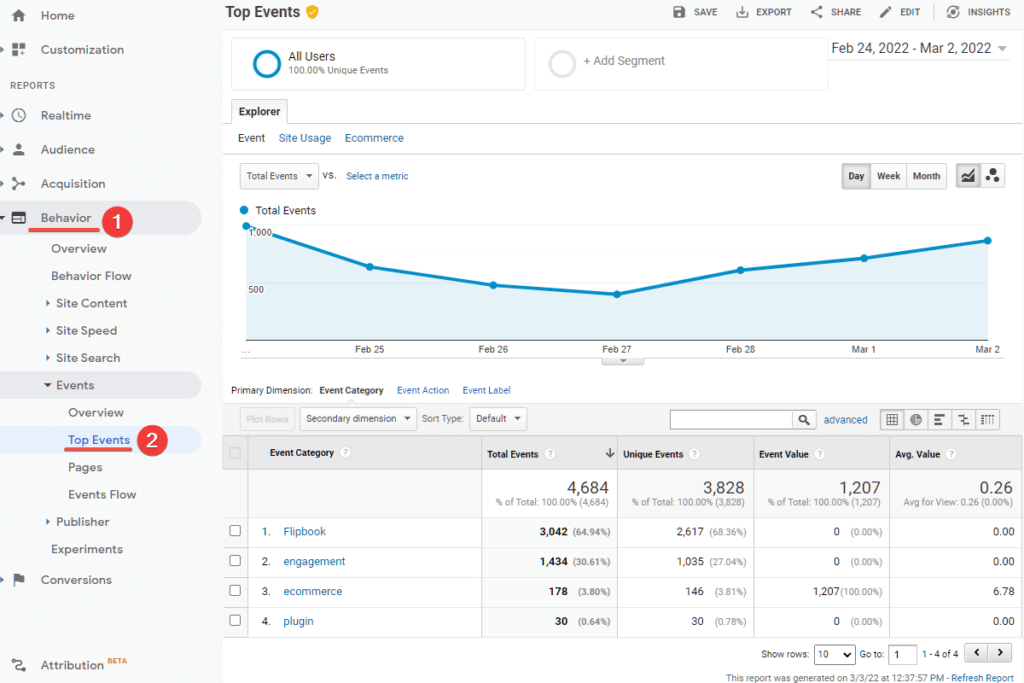
The Event data sent by DearFlip is available in Reports section of Google Analytics. Under Behavior -> Top Events. Additionally Realtime also display the Events.

GA4 – Define Events
In older Google Universal Analytics , label and category were default dimensions and used to work right away. Now they need to be defined in the admin panel of GA4.
Required Custom Definitions:
DearFlip requires two events to track the clicks.
- event_label
- event_category
Where is Custom Definitions:
- Goto Admin in Google Analytics
- Under Data Display Section,
- Click on Custom Definitions
- Under Custom definitions page Click on “Create Custom dimension”

Adding Custom Definitions – event_label:
Under Custom definitions page, Click on “Create Custom dimension“, you will get New custom dimension popup.
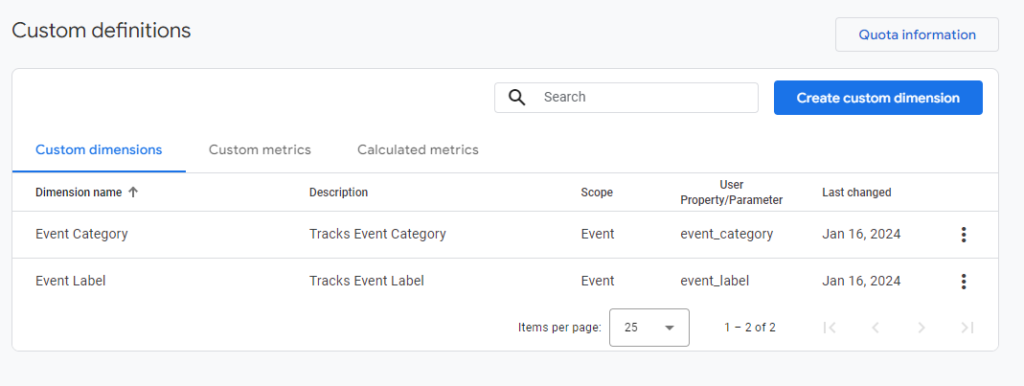
- Enter the Dimension Name: “Event Label”
- Enter the Description: “Tracks Event Label”
- Enter the Event Parameter: “event_label” This is important.
- Set the Scope : “Event”
- Click on Save

Adding Custom Definitions – event_category:
Under Custom definitions page, Click on “Create Custom dimension“, you will get New custom dimension popup.
- Enter the Dimension Name: “Event Category”
- Enter the Description: “Tracks Event Category”
- Enter the Event Parameter: “event_category” This is important.
- Set the Scope : “Event”
- Click on Save

Review Custom definitions:

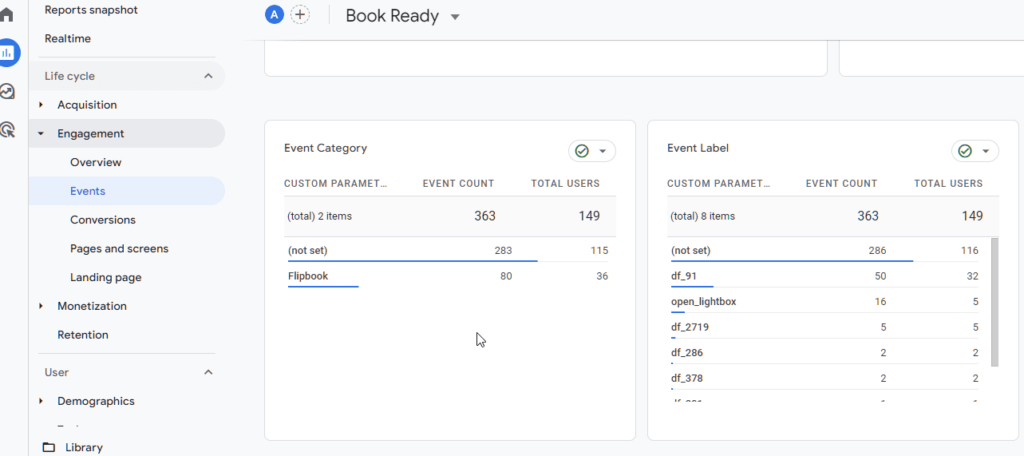
Checking Custom Definitions Events:
After that data can be accumulated and it will be displayed in Engagement->Events. You can view the events in RealTime or wait for them to appear after 24 hours.

Older data (not set) is not segregated so it won’t be displayed.
For more info you can look into:
- https://support.google.com/analytics/answer/10075209?hl=en#new-custom-dimension
- https://www.optimizesmart.com/ga4-custom-dimensions/
FAQs & Issues
Using Google Tag Manager?
If you are using Google Tag Manager make sure function gtag() is also added. Normally follow scripts iis added with the tag manager script. If not add it manually.
window.dataLayer = window.dataLayer || []; function gtag(){dataLayer.push(arguments);}
All DearFlip comments and discussion have been moved to
https://github.com/dearhive/dearflip-js-flipbook/discussions